Media Manager Documentation
This document describes the Media Manager tool used for managing product-related media in Cadify. The Media Manager allows users to set up printing areas from Excel workbooks, configure downloadable PDF brochures, and manage product pictures, all controlled via proxy objects in the code and stored in structured Excel worksheets.
Overview
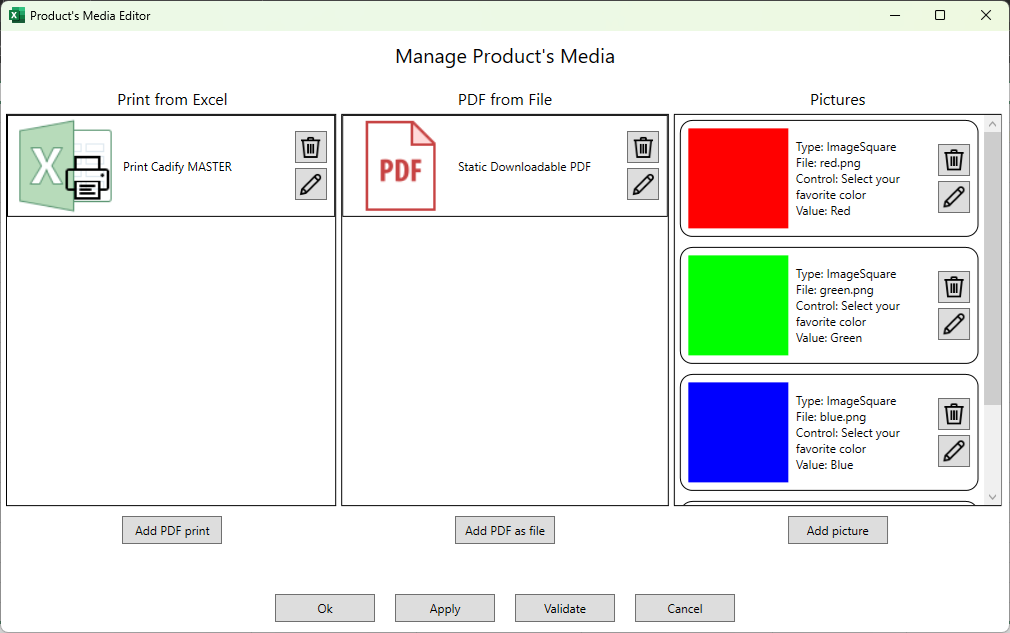
The Media Manager UI is divided into three main sections:
- Print from Excel: Configure print areas from specified worksheets and ranges.
- PDF from File: Set up downloadable PDF brochures for products.
- Pictures: Manage product images and associate them with controls.
Excel Data Mapping
The configuration for each media type is stored in a structured format in the Excel workbook. Each section uses a proxy object:
ProxyReportfor print areasProxyBrochurefor PDF brochuresProxyPicturefor product images
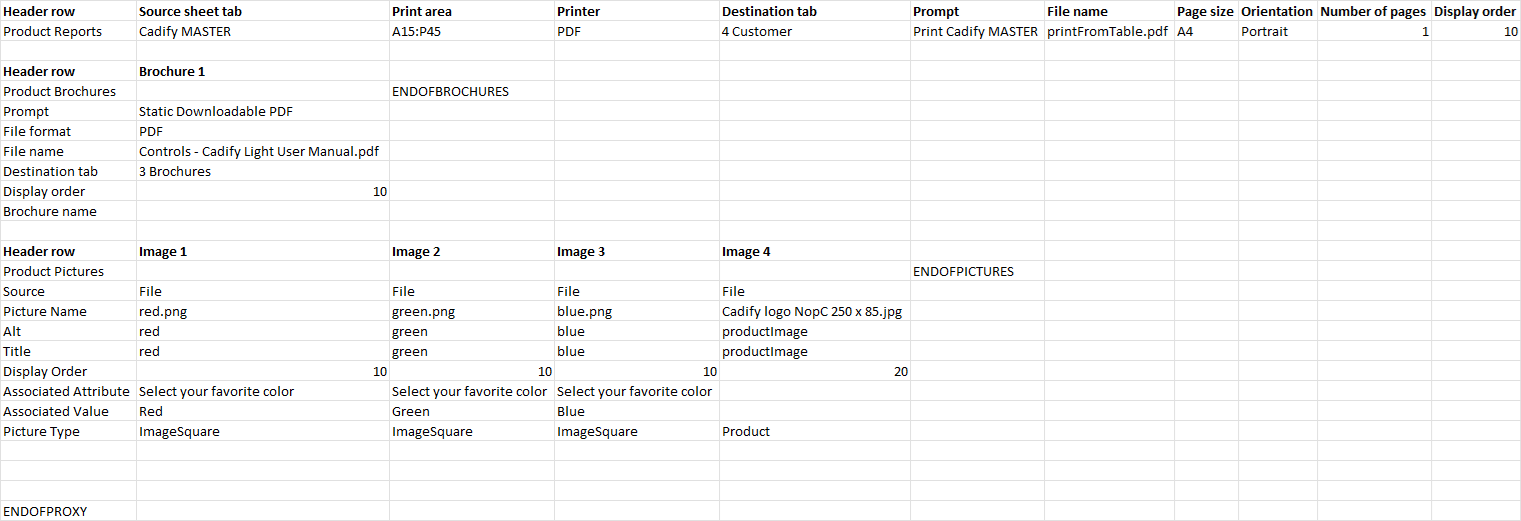
The following example shows how these proxies are stored in the Excel workbook:
1. Print from Excel (ProxyReport)
This subchapter explains how Cadify generates reports as part of integrated quality assurance. Reports are created from Excel using defined print ranges and exported as standard PDF files. They may contain drawings, control points, or checklists, and are always linked to the product configuration. The following pages describe how report templates are prepared, how print ranges are managed, and how outputs are distributed.
Allows the user to specify a worksheet and range to define a printable area for the product.
| Field | Example Value | Description |
|---|---|---|
| Source sheet tab | Cadify MASTER | Worksheet containing the print area |
| Print area | A15:P45 | Excel range to print |
| Printer | Output format (PDF) | |
| Destination tab | 4 Customer | Where the result is stored |
| Prompt | Print Cadify MASTER | Display name in UI |
| File name | printFromTable.pdf | Output file name |
| Page size | A4 | Page size |
| Orientation | Portrait | Page orientation |
| Number of pages | 1 | How many pages to print |
| Display order | 10 | UI display order |
System Behavior
Publish (Product Release)
- AddIn generates all report PDFs.
- Files are stored in the published folder on Cadify Cloud.
- nopCommerce imports and displays these PDFs on the product page.
- These become the product’s default published PDF outputs.
Calculation (Runtime Request)
- When nopCommerce triggers a Calculation:
- Cadify Service regenerates all report PDFs.
- Files are uploaded to the request folder.
- nopCommerce then fetches these request-specific files.
Storage Summary
| State | Behavior |
|---|---|
| Raw | No generated PDFs |
| Published | Default PDFs created at Publish |
| Request | Fresh reports regenerated per calculation |
2. PDF Brochure (ProxyBrochure)
Set up downloadable PDF files for products. The files are stored next to the workbook (e.g., on Cadify Cloud) and published with a download link.
| Field | Example Value | Description |
|---|---|---|
| Prompt | Static Downloadable PDF | Display name in UI |
| File format | File type | |
| File name | Controls - Cadify Light User Manual.pdf | PDF file name |
| Destination tab | 3 Brochures | Where the brochure info is stored |
| Display order | 10 | UI display order |
| Brochure name | (blank) | Optional brochure display name |
System Behavior
Embedded Brochures
- PDF stored inside the Excel file as binary.
- Always included when the product is published.
File-Based Brochures
- Source file stored in the raw Cadify Cloud folder.
- At Publish:
- Copied to the published folder.
- nopCommerce receives and hosts the published version.
Storage Summary
| State | Embedded | File-Based |
|---|---|---|
| Raw | Stored inside Excel | Stored in raw folder |
| Published | Published from Excel | Copied to published folder |
| Calculation | Not regenerated | Not regenerated |
Brochures are static; they do not change during runtime calculations.
3. Product Pictures (ProxyPicture)
Users can assign images as product pictures or connect them to Cadify Controls (as ImageSquare).
| Field | Example Value | Description |
|---|---|---|
| Source | File | Image file source |
| Picture Name | red.png / green.png / blue.png | Filename of the image |
| Alt | red / green / blue | Alt text for the image |
| Title | red / green / blue | Title or description |
| Display Order | 10 / 20 | UI display order |
| Associated Attribute | Select your favorite color | Linked control/attribute |
| Associated Value | Red / Green / Blue | Value for the attribute |
| Picture Type | ImageSquare / Product | Type of image |
Example Images Mapped in UI:
-
ImageSquare: Used for selectable color squares (red, green, blue). -
Product: Used for main product image (e.g., Cadify logo).
System Behavior
Embedded Pictures
- Stored as binary inside Excel.
- Available only in the raw Excel file until Publish.
File-Based Pictures
- Stored in the raw folder on Cadify Cloud.
- Displayed inside the AddIn.
Publish Behavior
During Publish:
-
All pictures (embedded + file-based) are uploaded to the nopCommerce Picture Manager.
-
nopCommerce becomes the hosting source for images.
-
Cadify Cloud picture files are no longer used on the live site.
Storage Summary
| State | Embedded | File-Based |
|---|---|---|
| Raw | Stored inside Excel | Stored in raw folder |
| Published | Uploaded to nopCommerce | Uploaded to nopCommerce |
| Request | Not regenerated | Not regenerated |
Proxy Object Mapping
- ProxyReport: Defines Excel printing areas.
- ProxyBrochure: Defines downloadable PDF brochures.
- ProxyPicture: Defines product images and their attributes.
Each proxy is represented as a structured row in the Excel workbook, making it easy to configure and automate media management for products.
UI Actions
- Add PDF print: Add a new Excel print configuration.
- Add PDF as file: Attach a downloadable PDF brochure.
- Add picture: Add new product images and associate them with controls.
Buttons at the bottom allow users to validate and apply changes, ensuring the product's media settings are correctly saved.
For more details, refer to the sample UI and Excel data structure above.