Best practices
Creating Web Controls and setting up calculations to have dynamically changing lists.
This guide shows how to build Web Controls for a TableTop product directly and wire controls to lookups and calculations that live in the Table Top Database sheet of the same workbook.
Starting point
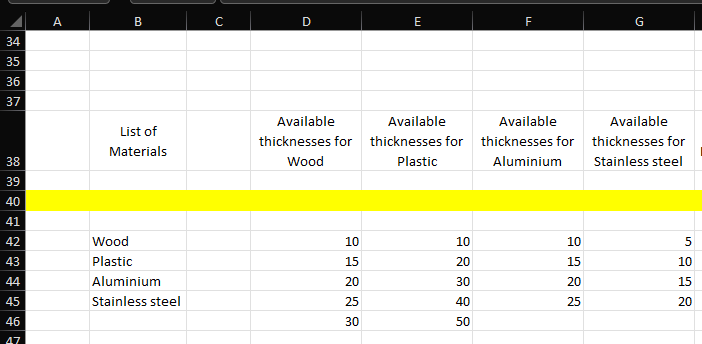
- Add a new worksheet and name it 'Table Top Database'
- Determine some static elements like the List of Materials and Available thicknesses for Wood (e.g., 10, 15, 20, 25, 30)
Create the first Control
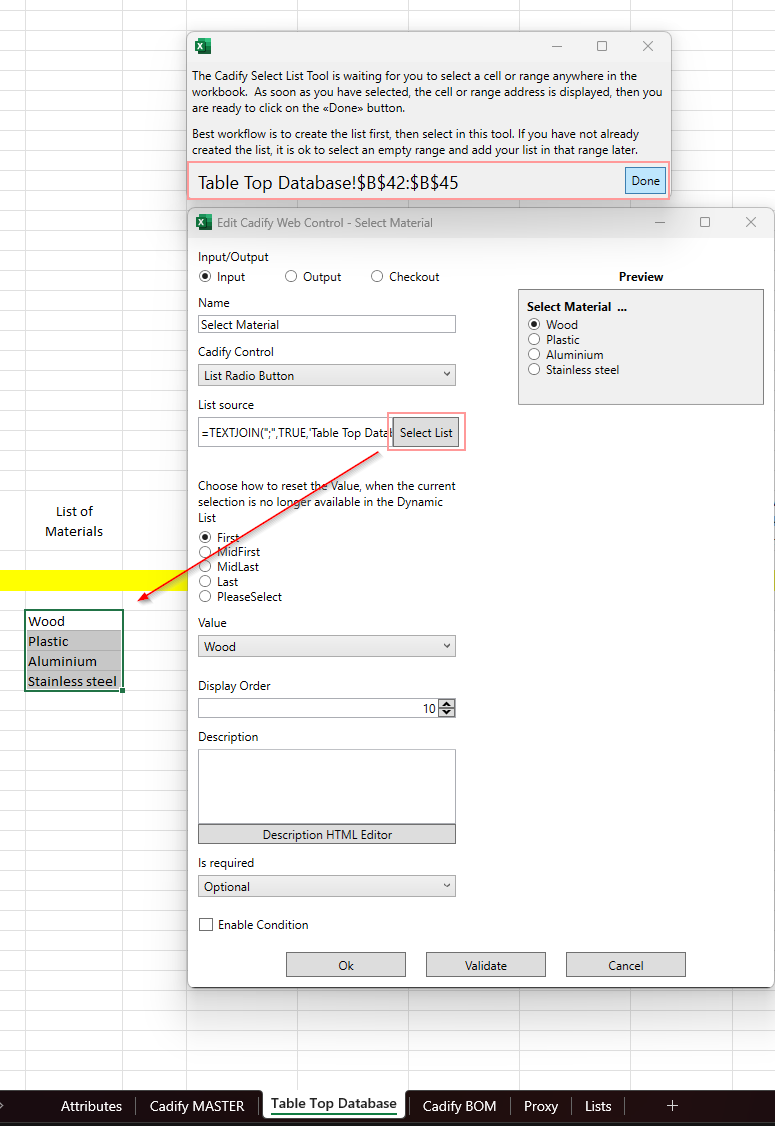
Create a control to manage material selection, name it 'Select Material,' and set up the values list to the material list created on the 'Table Top Database' tab.
To create a control you can click Add
(Add a new Cadify Control)

After creation, the new control will appear in the Task Pane.
From there you can edit properties, link data, and preview the control output.
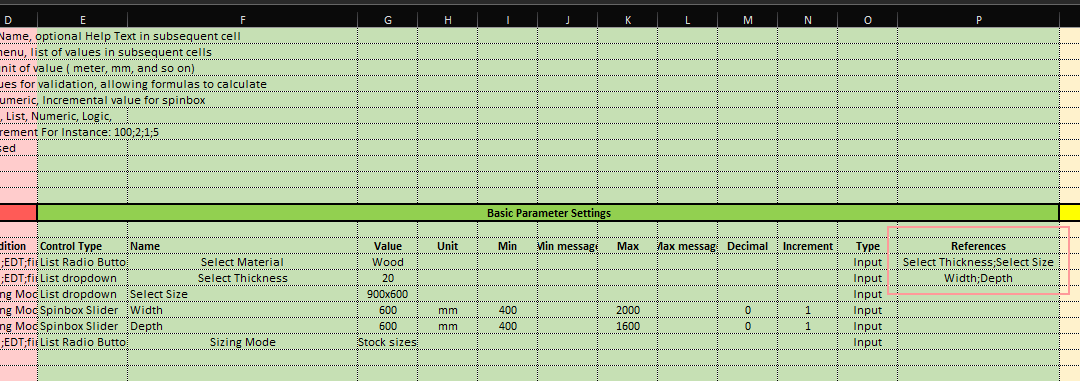
| Parameter | Value |
|---|---|
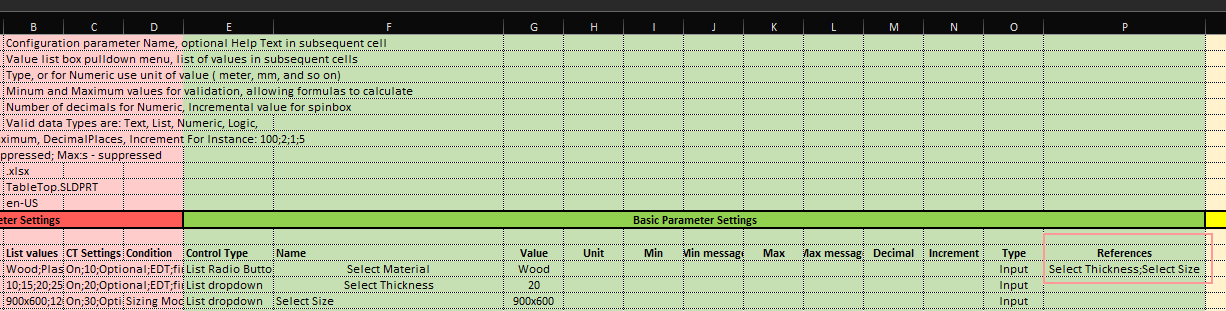
| Name | Select Material |
| Type | List Radio Button |
| List Source | =TEXTJOIN(";",TRUE,'Table Top Database'!$B$42:$B$45) |
Set up your first calculation
To determine the available thicknesses based on the selected material, you will need to create your first formulas in 'Table Top Database':
- Determine the selected index of available materials:
| Target Cell | Value |
|---|---|
| 'H40' on Table Top Database tab | =WHERE('Cadify MASTER'!G15;'Table Top Database'!B42:B45;0) |
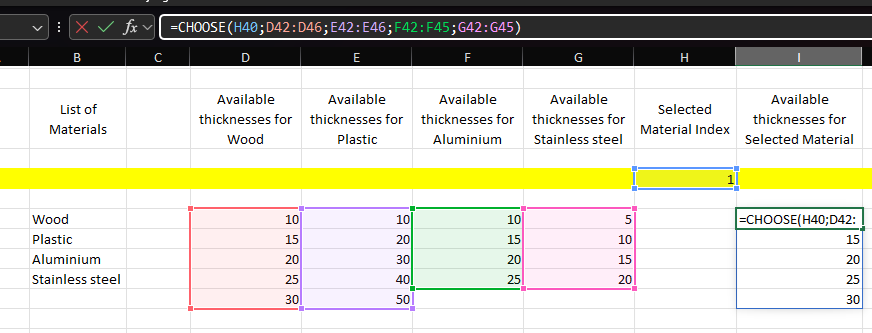
- Now with the index, select the proper available thicknesses:
| Target Cell | Value |
|---|---|
| 'I42' on Table Top Database tab | =CHOOSE(H40;D42:D46;E42:E46;F42:F45;G42:G45) |
- As a last step, now create a control with the generated list:
| Parameter | Value |
|---|---|
| Name | Select Thickness |
| Type | List Dropdown |
| List Source | =TEXTJOIN(";",TRUE,'Table Top Database'!$I$42:$I$59) |
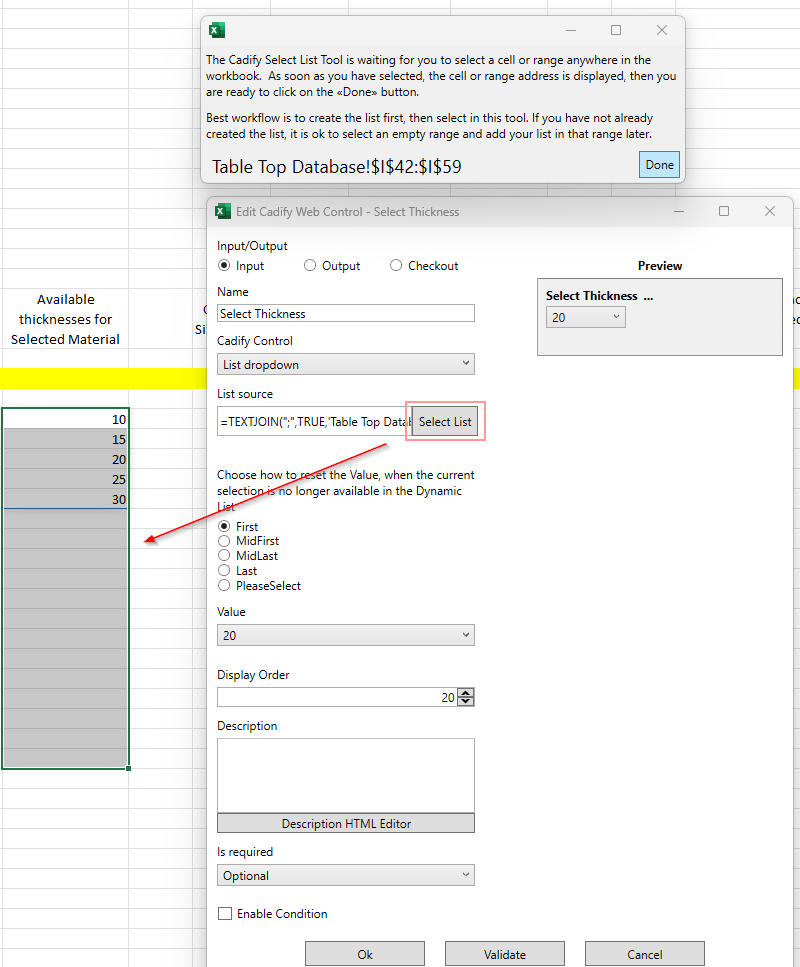
💡 Always select a range large enough to cover all possible values. Cadify will automatically remove any empty elements from the control, so you don’t need to worry about blanks.
💡 Call Build Control Hierarchy so dynamically changing elements will be picked up by the Cadify Calculation Engine.
Tools -> Build Cadify Control Hierarchy. It will generate the references list in the Cadify MASTER 'P' column.
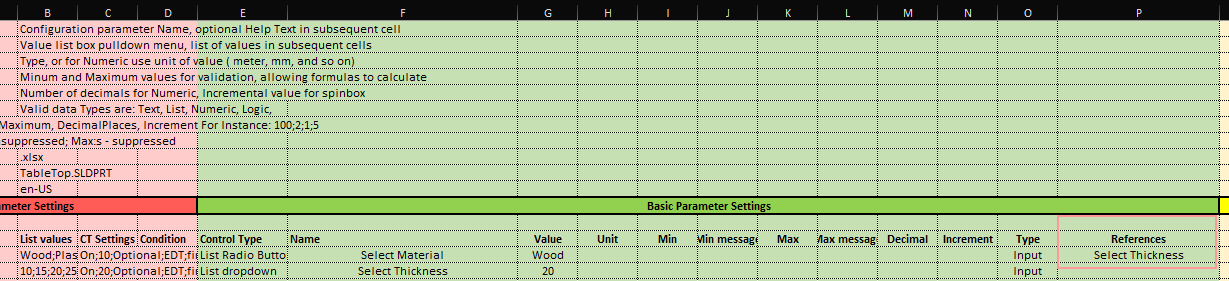
🎉 Congratulations! You have successfully created your first control with dynamically changing available thicknesses based on the selected material.
Practise a little bit more
To practise dynamic lists a little bit more, let’s add some more static elements into the Table Top Database.

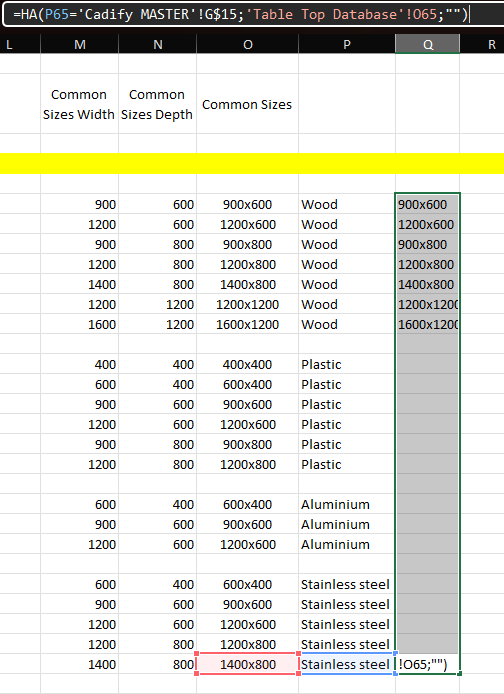
- Fill the 'Q' column with calculations:
=IF(P65='Cadify MASTER'!G$15;'Table Top Database'!O65;"")
This will provide an element of a list or an empty string if the selected material is not matched.
- Create a UNIQUE/FILTER function combination to generate the proper available values:
| Target Cell | Value |
|---|---|
| 'S42' on Table Top Database tab | =UNIQUE(FILTER(Q42:Q65;Q42:Q65<>"")) |
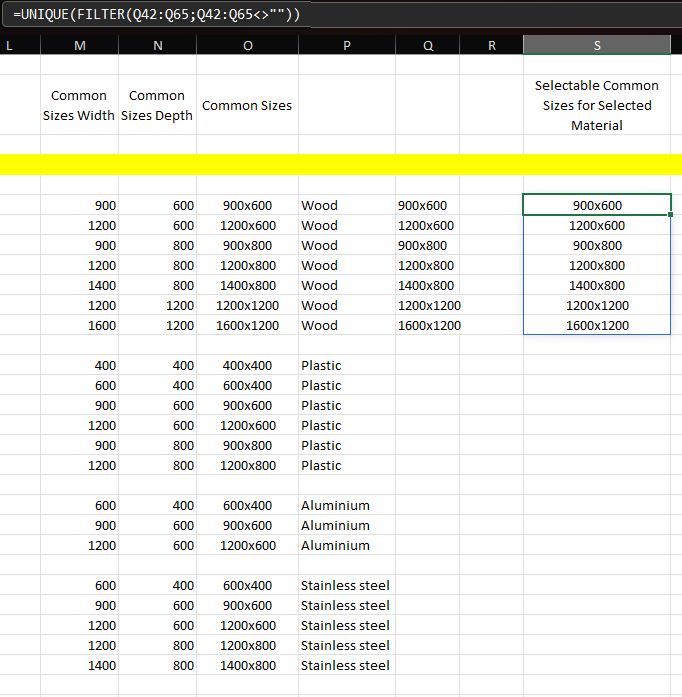
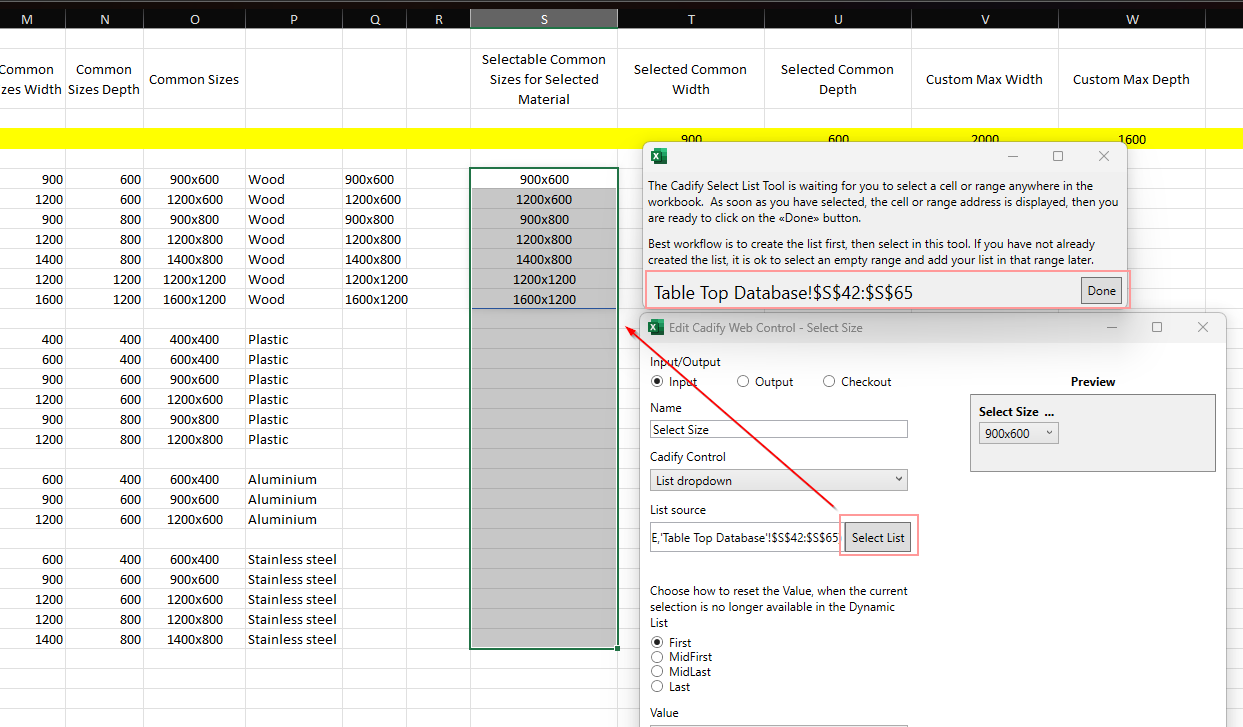
- Now everything is ready to create a control to select from stock-sized Table Tops:
| Parameter | Value |
|---|---|
| Name | Select Size |
| Type | List Dropdown |
| List Source | =TEXTJOIN(";",TRUE,'Table Top Database'!$S$42:$S$65) |
💡 Remember to call Build Control Hierarchy so dynamically changing elements will be picked up by the Cadify Calculation Engine.
Tools -> Build Cadify Control Hierarchy. It will generate the references list in the Cadify MASTER 'P' column.
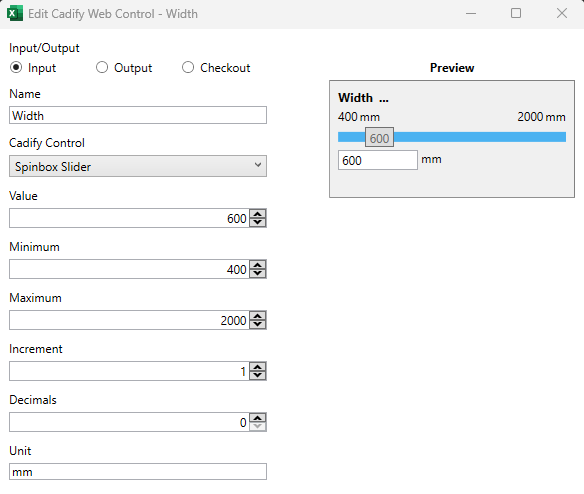
- Create two Slider controls as well to let the users control the width and depth of the Table Top manually.
| Parameter | Value |
|---|---|
| Name | Width |
| Type | Spinbox Slider |
| Value | 600 |
| Minimum | 400 |
| Maximum | 2000 |
| Parameter | Value |
|---|---|
| Name | Depth |
| Type | Spinbox Slider |
| Value | 600 |
| Minimum | 400 |
| Maximum | 1600 |
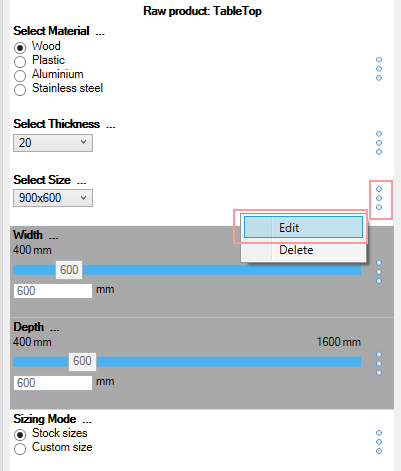
Display only relevant Controls
After creating two different options to determine the size of the Table Top, you may ask yourself: "Okay, but I would like to show only the reasonable controls to determine size. How do I do so?"
- First create a control to determine which option is preferred:

| Parameter | Value |
|---|---|
| Name | Sizing Mode |
| Type | List Radio Button |
| List Source | =TEXTJOIN(";",TRUE,'Table Top Database'!K42:K43) |
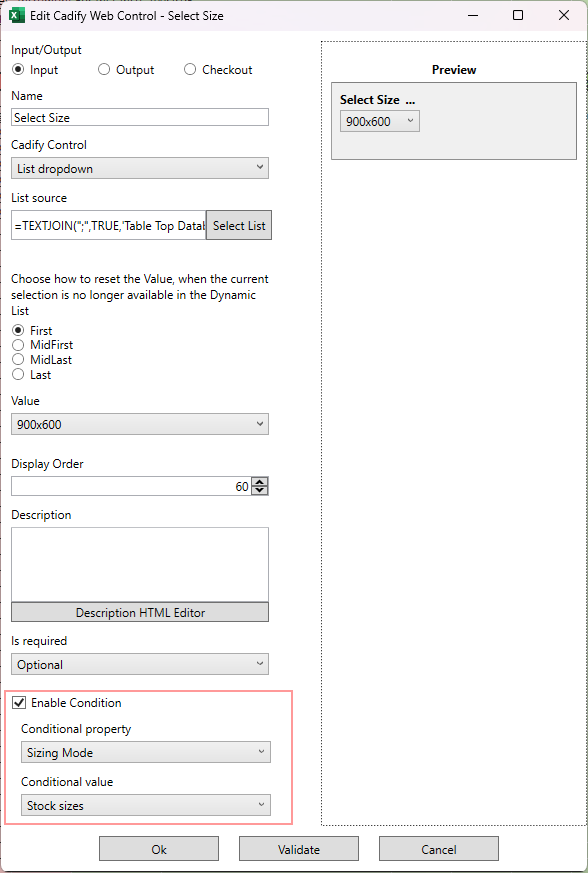
- Adjust the settings of controls that are supposed to change the size by adding a condition for each:
- Edit the control
- Check the 'Enable Condition' setting
- As the Conditional property, select 'Sizing Mode' that you just created
- Set 'Stock sizes' for the Conditional value of the 'Select Size' control, and set 'Custom size' for the 'Width' and 'Depth' controls.
Dynamically change Minimum and Maximum values of a Control
- For numerical controls like Spinbox Sliders, there is also an option to set up minimum and maximum values (starting and end points). For that, set up some formulas in the Table Top Database:
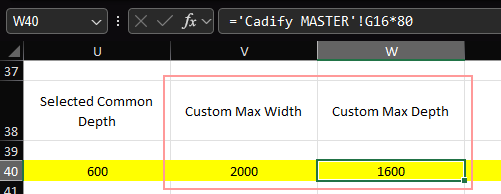
| Target Cell | Value |
|---|---|
| 'V40' on Table Top Database tab | ='Cadify MASTER'!G16*100 |
| 'W40' on Table Top Database tab | ='Cadify MASTER'!G16*80 |
- Link the calculated maximum values back to the control by setting formulas on Cadify MASTER:
| Target Cell | Value |
|---|---|
| 'K18' on Cadify MASTER tab | ='Table Top Database'!V40 |
| 'K19' on Cadify MASTER tab | ='Table Top Database'!W40 |
💡 Remember to call Build Control Hierarchy so dynamically changing elements will be picked up by the Cadify Calculation Engine.
Tools -> Build Cadify Control Hierarchy. It will generate the references list in the Cadify MASTER 'P' column.