DART Training User Manual
Overview
The DART Training (Design AI Rendering Tool) interface is a powerful tool for generating machine learning training datasets from your Cadify products. It automates the creation of JSON configuration files and PNG product images that can be used to train AI models for product visualization and design generation.
This tool enables you to:
- Generate large datasets of product configurations automatically
- Create training data for multiple AI models simultaneously
- Export product visualizations as PNG images
- Manage and organize training datasets efficiently
Prerequisites
Before using DART Training, ensure:
- A RAW product is open in Cadify
- The product has properly configured Cadify controls
- Sufficient disk space for training data (JSON and PNG files can require significant storage)
- SolidWorks is running and the model is loaded
Accessing DART Training
To open the DART Training interface:
- Navigate to Tools menu in Cadify
- Select DART Training
- The DART Training window will open
Note: This option is disabled if no product is currently open.
Interface Layout
Header Section
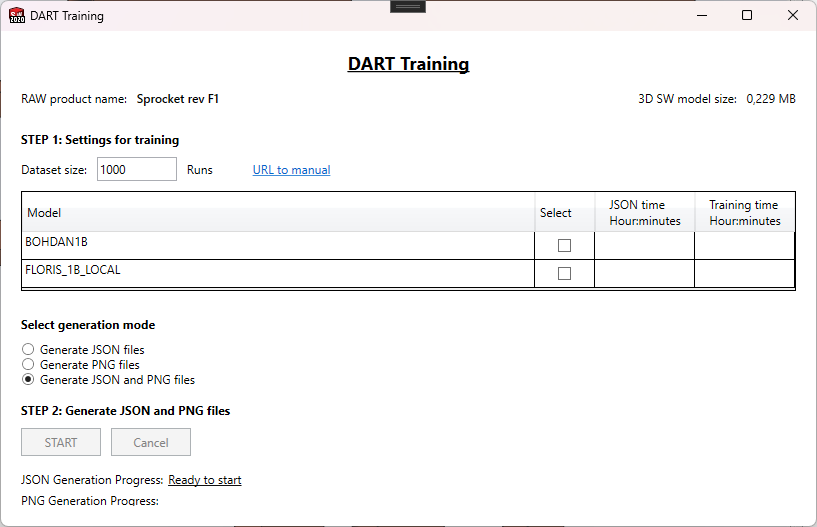
The top of the window displays important product information:
- RAW product name: The name of the currently open raw product
- 3D SW model size: The file size of the SolidWorks model
This information helps you verify you're working with the correct product.
STEP 1: Settings for Training
Dataset Size
Set the number of product configurations to generate for your training dataset.
- Default: 1000 runs
- Enter the desired number of configurations in the Dataset size field
- Larger datasets provide better training data but take longer to generate
Tip: Start with a smaller dataset (e.g., 100-500) to test your setup before generating the full training set.
Model Selection Table
The table displays available AI models for training data generation:
| Column | Description |
|---|---|
| Model | The name and type of the AI model (e.g., BODAN, FLORIS_1B_RUNPOD, FLORIS_1B_LOCAL, BODAN1B) |
| Select | Checkbox to include this model in the generation process |
| JSON time | Estimated time to generate JSON files (Hour:minutes format) |
| Training time | Estimated time to generate PNG files (Hour:minutes format) |
How to use:
- Review the available models in the table
- Check the Select box for each model you want to generate data for
- Review the estimated times to plan your workflow
- You can select multiple models to generate training data simultaneously
Note: Time estimates update automatically when you change the dataset size.
Generation Mode Selection
Choose how you want to generate your training data:
🔹 Generate JSON files only
Generates only the JSON configuration files without creating images.
Use when:
- You want to prepare configuration data first
- You need to validate JSON data before image generation
- You're working on model configuration analysis
🔹 Generate PNG files only
Generates PNG images from existing JSON files in your training folders.
Use when:
- JSON files already exist from a previous run
- You want to regenerate images with different settings
- You need to create images for a subset of existing configurations
Important: This mode requires that JSON files already exist in the model training folders. The tool will detect existing JSON files and generate corresponding PNG images.
🔹 Generate JSON and PNG files (Recommended)
Generates both JSON configuration files and PNG product images in a single workflow.
Use when:
- Creating a complete training dataset from scratch
- You want the most efficient workflow
- Both data types are needed for your AI model training
STEP 2: Generating Training Data
Starting the Generation Process
-
Verify your settings:
- Dataset size is correct
- At least one model is selected
- Generation mode is appropriate for your needs
-
Click the START button for your selected mode:
- START (in JSON section) - Generates JSON files only
- START (in PNG section) - Generates PNG files only
- START (in combined section) - Generates both JSON and PNG files
-
Handle folder conflicts (if applicable):
If existing training data is detected, you'll be prompted to choose how to proceed:
- Generate new, keep existing: Continues numbering from the last existing file
- Clean and generate: Deletes existing files and starts fresh from 1
- Cancel: Aborts the operation
For PNG-only mode: If the number of existing JSON files doesn't match your dataset size, you'll be asked whether to adjust the dataset size to match the existing files.
Monitoring Progress
During generation, the interface displays real-time progress:
JSON Generation Progress
- Shows current file number and total count (e.g., "45 / 1000")
- Displays elapsed time
- Updates continuously as files are created
PNG Generation Progress
- Shows current PNG number and total count
- Displays generation status
- Updates as images are rendered and saved
Canceling Generation
If you need to stop the process:
- Click the Cancel button
- The process will stop after completing the current file
- All files generated up to that point will be saved
Note: Cancellation may take a few moments as the current operation completes gracefully.
Completion Indicator
When generation finishes successfully:
- A green "Finished" indicator appears
- The indicator confirms all files were created successfully
- You can now close the window or start a new generation
Understanding the Generation Process
JSON File Generation
For each configuration in your dataset:
- The tool randomly assigns values to all Cadify controls within their defined ranges
- The configuration is validated to ensure it represents a valid product
- A JSON file is created containing all parameter values and metadata
- The file is saved with an incremental number (e.g.,
1.json,2.json, etc.)
JSON Structure: The generated JSON files follow the format required by the selected AI model type and include all necessary configuration parameters.
PNG Image Generation
For each configuration:
- The tool loads the configuration from the JSON file (or uses the current random configuration)
- The SolidWorks model is updated with the parameter values
- A PDF is temporarily generated from the active drawing
- The PDF is converted to PNG format for each selected model
- The PNG is saved in the appropriate model folder
Image Organization: PNG files are saved in separate folders for each selected model within your product's training directory.
File Organization
Training data is organized in the following structure:
[Product Folder]/
└── ModelTraining/
    ├── BODAN/
    │   ├── 1.json
    │   ├── 1.png
    │   ├── 2.json
    │   ├── 2.png
    │   └── ...
    ├── FLORIS_1B_RUNPOD/
    │   ├── 1.json
    │   ├── 1.png
    │   └── ...
    └── DART Training status.json
- Each model has its own subfolder
- JSON and PNG files use matching numbers
- Status file tracks generation progress and metadata
Best Practices
Planning Your Dataset
- Start small: Generate 100-500 samples first to verify everything works correctly
- Scale up: Once validated, generate your full dataset (typically 1000+ samples)
- Monitor resources: Watch disk space and generation time estimates
Model Selection
- Select only the models you actually need to train
- Different models may have different performance characteristics
- Review time estimates before starting large generations
Workflow Recommendations
For new datasets:
- Use "Generate JSON and PNG files" mode
- This ensures data consistency between JSON and images
For regenerating images:
- Use "Generate PNG files only" mode
- This saves time by reusing existing JSON configurations
For testing configurations:
- Use "Generate JSON files only" mode first
- Validate the JSON data
- Generate PNGs separately once validated
Managing Disk Space
- Monitor available disk space before large generations
- Consider cleaning old training data you no longer need
- PNG files can be large; estimate ~1-5 MB per image depending on product complexity
Handling Interruptions
- The Cancel button provides a clean stop
- Partially completed datasets can be continued using "Generate new, keep existing" option
- Status files help track what has been generated
Troubleshooting
"No product is open"
Solution: Open a RAW product before accessing DART Training from the Tools menu.
"No models selected"
Solution: Check at least one model in the Selection table before clicking START.
"Missing JSON files" (PNG-only mode)
Solution: Ensure JSON files exist in the model folders, or switch to a different generation mode.
Generation is slow
Possible causes:
- Large model file size requires more rendering time
- Many models selected simultaneously
- System resource limitations
Solutions:
- Generate for fewer models at once
- Reduce dataset size for testing
- Ensure sufficient RAM and CPU resources
PNG files are missing or corrupted
Possible causes:
- Drawing not properly configured
- SolidWorks rendering issues
- Insufficient disk space
Solutions:
- Verify your product has a valid drawing setup
- Check available disk space
- Try regenerating the affected files
Time estimates seem inaccurate
Note: Time estimates are calculated based on average performance. Actual times may vary based on:
- Model complexity
- System performance
- Current system load
Integration with CadifyDart Excel Function
The training data generated by this tool is designed to work seamlessly with the CadifyDart() Excel function for AI-generated product visualizations.
For more information on using the generated training data with the CadifyDart function, see the CadifyDart documentation.
Support
If you encounter issues not covered in this manual:
- Use Tools → Save log files to capture diagnostic information
- Contact Cadify support with your log files and a description of the issue
- Refer to the online manual via the "URL to manual" link in the interface
Summary
The DART Training tool provides a streamlined workflow for creating AI training datasets:
- Configure your dataset size and select target models
- Choose your generation mode (JSON, PNG, or both)
- Start the generation process
- Monitor progress with real-time feedback
- Use the generated data to train AI models for product visualization
With proper planning and the right settings, you can efficiently create high-quality training datasets for your machine learning workflows.